Welcome to Arkansas State University!

What is a Learning Management System

A Learning Management System (LMS) is a secure online program that is designed to enhance teaching and learning. It is an online application for teaching, learning, community building, and knowledge sharing. It enables instructors to deliver materials for courses, collect work submitted by students, and return graded feedback. In addition, students enrolled in LMS courses are engaged with an interactive learning environment. You can use any theory or model for teaching as Learning Management Systems are open, flexible, and centered on student achievement.

Canvas_Stacked_ByInstructure_Color_RGB.png

Which LMS is used at A-State

Canvas LMS is used by learning institutions, educators, and students to access and manage online course learning materials and communicate about skill development and learning achievement. 

Canvas includes a variety of customizable course creation and management tools, course and user analytics and statistics, and internal communication tools. 

To learn more about Canvas, see the Canvas Basics Guide.


    Getting Started

    Wondering how to get started using Canvas? The information below will help. 


  • Getting an Account and Accessing Canvas

    To get access to Canvas all new hires will first need to verify their A-State email account. About 24 hours after their email address is validated their Canvas account will be automatically created. 

    New faculty members should then be able to access some training resources and any class listed in Banner with them as the Instructor when they login to Canvas. New staff members are not automatically added to any courses or organizations. Their office needs to request that they be manually added to any resources they will need to manage.

    Accessing Canvas

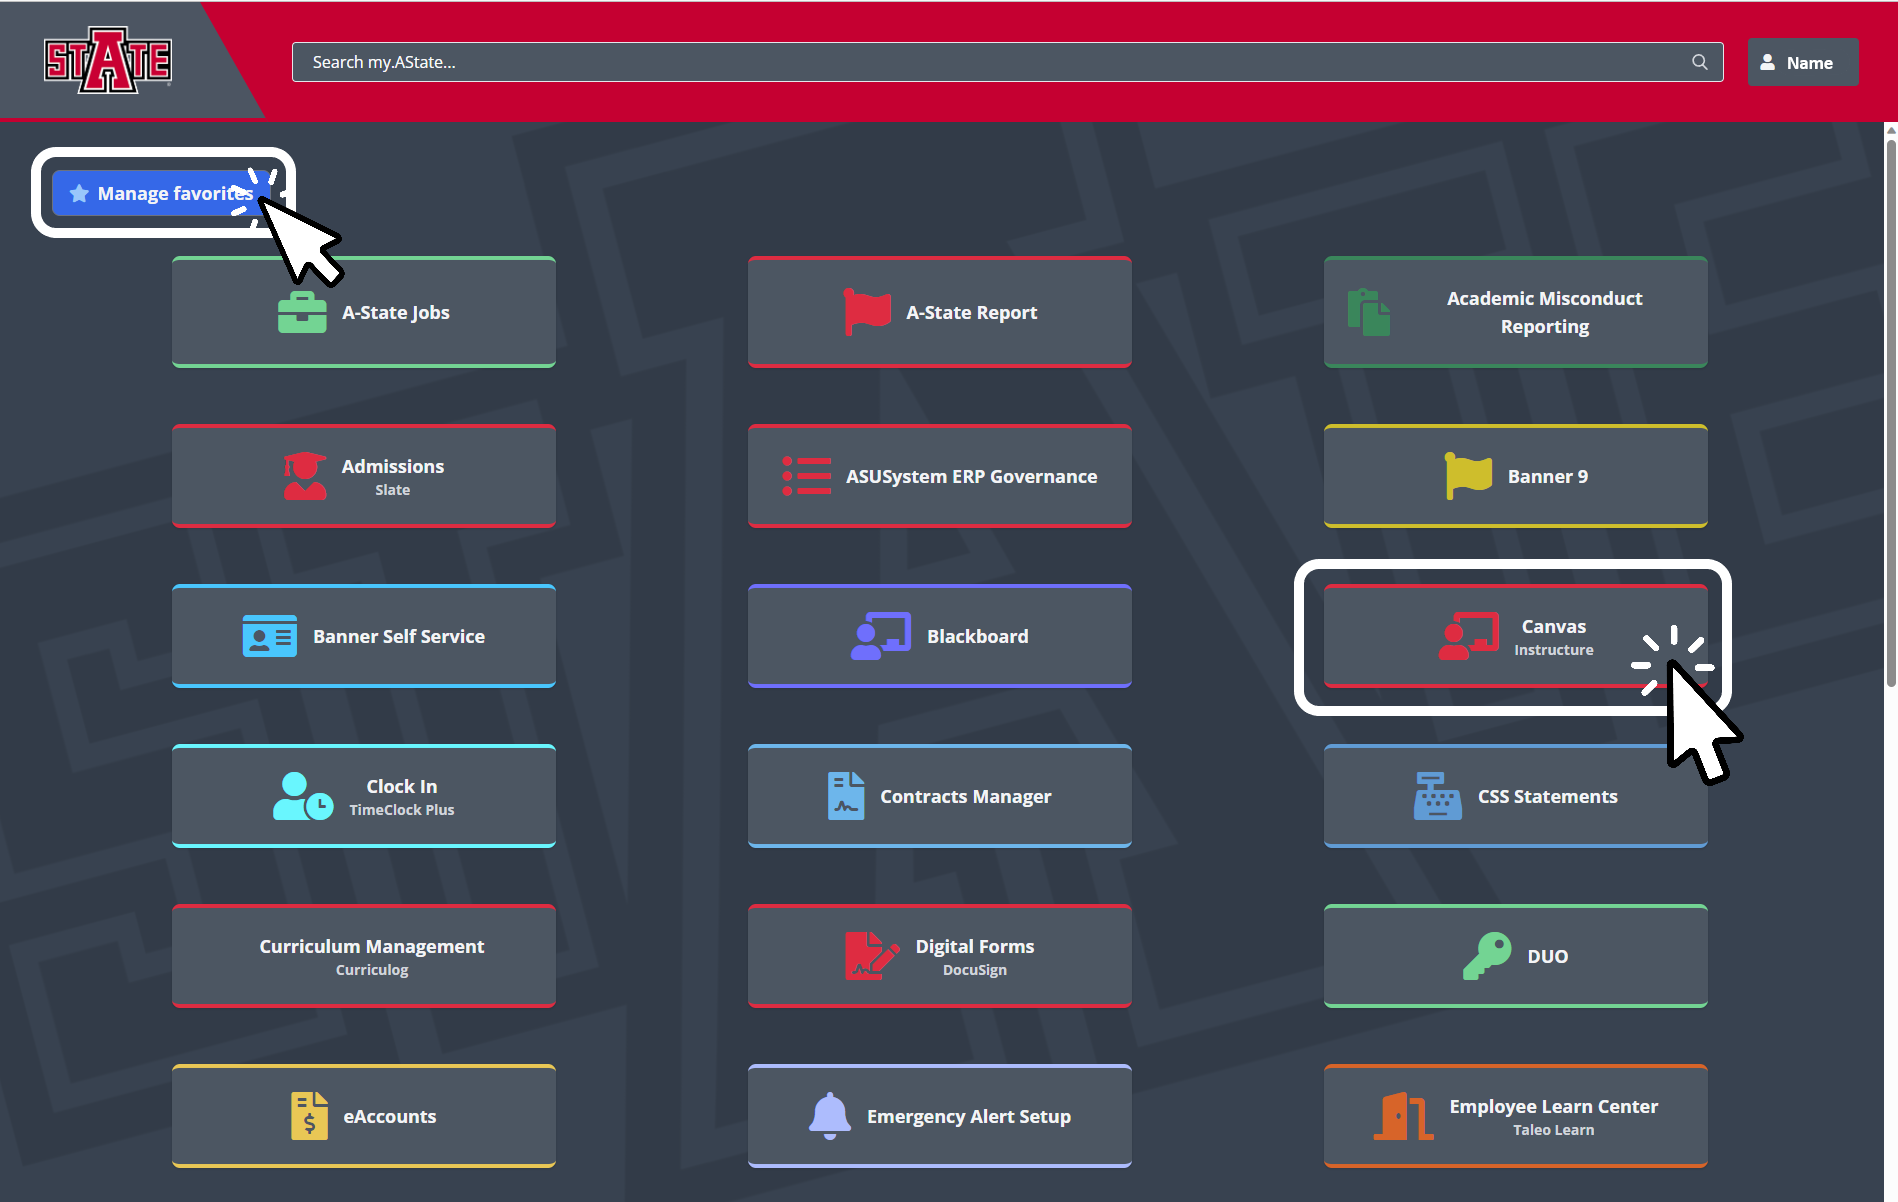
    If you used my.astate you will need to select the Canvas tile from the Dashboard. You can also use the Manage favorites button to pin the tiles that you use most often to the top of the list by dragging them up.

    My Astate Canvas Tile.png

  • Browser Preference

    For the best Canvas experience, users should access Canvas using a desktop or laptop computer. Canvas is browser based and can be access on a Windows or Mac computer with Internet access.

    Use the Browser Checker to check that your browser is set up to use Canvas.

    • Users must use a recommended and supported browser, such as Firefox or Chrome.
    • JavaScript must be installed and enabled on browser.
    • Popups must be enabled on the browser.

    Clearing your browser's cookies and cache clears up most website error messages and technical issues.

  • Organizing your Dashboard and Courses List

    The Dashboard is your landing page in Canvas.

    Our dashboard defaults to the Card View, but you can switch that to a Recent Activity View instead. 

    To learn more, see the Canvas Instructor Guide: How do I use the Dashboard as an instructor?

    If you need, you can use the Move option in the Options menu for the Course Cards to organize your courses. You can also drag and drop the Course Cards to rearrange them.

    To learn more, see the Canvas Instructor Guide: How do I view my favorite courses in the Card View Dashboard as an instructor?

    All Courses

    However, you may find it easier to use the All Course list so you can use the Star icons to favorite courses. 

    This way you can mark multiple courses at a time as favorites. Once you have begun to mark courses as Favorited, only they will show on the Dashboard and in the Courses List.

    To learn more, see the Canvas Instructor Guide: How do I view all my Canvas courses as an instructor?

  • Templates and Canvas Commons

    Commons is a learning object repository that enables educators to find, import, and share resources. A digital library full of educational content, Commons allows Canvas users to share learning resources with other users as well as import learning resources into a Canvas course.

    About Canvas Commons

    In Global Navigation, click the Commons link.

    Open Commons

    To learn more about Canvas Commons, see the Canvas Community site: How do I use Commons?

    About Course Templates

    While we are no longer preloading templates into course shells, we do have templates available in the Commons for faculty to import into their courses. We currently have a Generic Template that can be used for any course as well as a few that contain the assessment materials for specific courses. To find these templates, you will want to use the "Shared With" filter to select Arkansas State University. That will limit your options to just the materials available to those who teach for our university. 

    CommonsFilters.png

    Clicking on the title of the template you would like to use will then take you to the Course Preview where you can use the Import/Download button to select the course to copy the template to. You may need to use the Import into Canvas box to search for your course names. When you find the course or courses that you would like to add the template to, check the boxes for them and then click Import into Course.

    CommonsImport.png

  • Edit Your Canvas Profile and Notification Settings

    Edit Profile

    The default values for your Canvas Profile are imported from Banner. Employees requesting a name change will need to contact Human Resources at 870-972-3454. However, you should be able to freely edit the other fields in your Canvas profile. For instructions on how to add a profile picture, or add something to the Name Pronunciation field, see the following link to the Canvas Basics Guide.

    How do I edit my profile in my user account?

    Change Default Contact Options

    Canvas will default to your A-State email addresses for notifications, starting with a @smail.AState.edu account if it exists. You can add additional contact options to receive notifications and change the default email address. For instructions on how to update your contact options, see the following links to the Canvas Basics Guide.

    How do I add contact methods to receive Canvas notifications?

    How do I change my default email address in my user account?

    Notification Settings

    Canvas includes a set of default notification settings you can receive for your courses. However, you can change the default settings by setting your notification settings. These settings only apply to you; they are not used to control how course updates are sent to other users. To learn more about your notification settings, see the following link to the Canvas Basics Guide.

    How do I manage my Canvas notification settings?

    Please note that while the default settings should be so that your students receive notifications of announcements immediately, they can edit their own notifications to not receive timely notifications about your course. If students claim to not be receiving notifications, they may need to check the notification settings they have enabled for your course.


  • Managing Course Details

    Learn how to find and change several Course Details settings. 


  • Identifying your Courses

    There are three things you need to know to help identify your courses: The Course Code, The Course ID, and the Subaccount.

    Course Codes

    All faculty should see two types of courses in their Course List and Dashboard, Live Shells and Development shells. You can identify which is which by going to the settings of your course, which is always at the end of the Course Navigation menu, and looking for the Course Code field. The Course Code will also be in the Course Breadcrumb menu, clicking it will always return you to Home in the Course Navigation.   
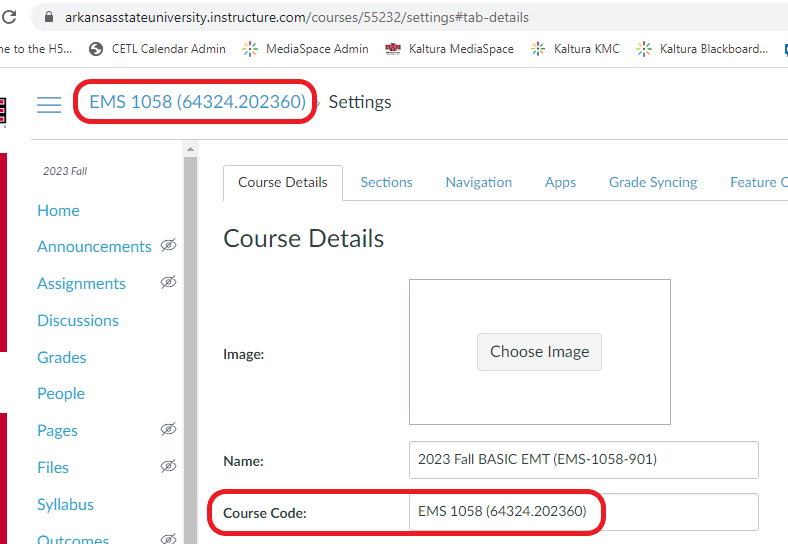
    Location of the Course Code field on the Course Details page and in the Course Breadcrumb list

    Live Shells

    Live shells are created by ITS using the course enrollments from Banner. These shells will have Course Codes that include the Course Prefix, Number, and the Banner Course Reference Number (CRN). The CRN is composed of a five digit number that begins with the first digit of the term prefix, 10 for spring, 30 for summer, and 60 for fall, and the term code after the period. The term code is composed of the current year and term prefix. These shells are typically created 3-4 weeks before the start of a term. E.g. 60102.202160 would be the CRN for a class from the Fall 2021 term.

    Development Shells

    All new faculty are given a few Development shells to build out course materials. These shells will have a Course ID that is composed of your A-State ID number, a period, and a number indicating the order the course was created. These shells are not attached to a course in Banner and are available at all times. You can work in these shells at any time and then copy the materials into the live shells every semester once they are created by ITS.

    Course IDs

    While the Course Codes are generated by the course information from Banner, Canvas also has its own internal way of identifying courses, the Course ID. This ID can be helpful to know when you are wanting to Crosslist classes, as this is not a editable field and will be unique for every shell. To find the Course ID you have to find the number that is after the word courses in the browser address bar while in the course. 
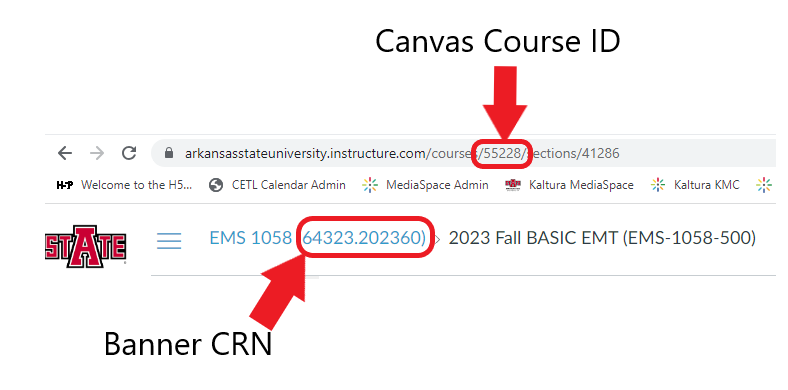
    Location of the Canvas Course ID in the address bar and the Banner CRN in the Course Code

    Subaccounts

    The final thing to know to help identify courses is which Subaccount the course is in. ITS has setup subaccounts within our Canvas instance for each department. This allows them to deploy department specific integrations with publishers or other third party tools, as well as making some administration and report processes simpler. This is important to know because there are some things that can't go across subaccounts and we may need to know your subaccount in order to find your course when helping troubleshoot issues with you. You can find the sub account by going to the settings of your course, which is always at the end of the Course Navigation menu, and looking for the Subaccount field. 
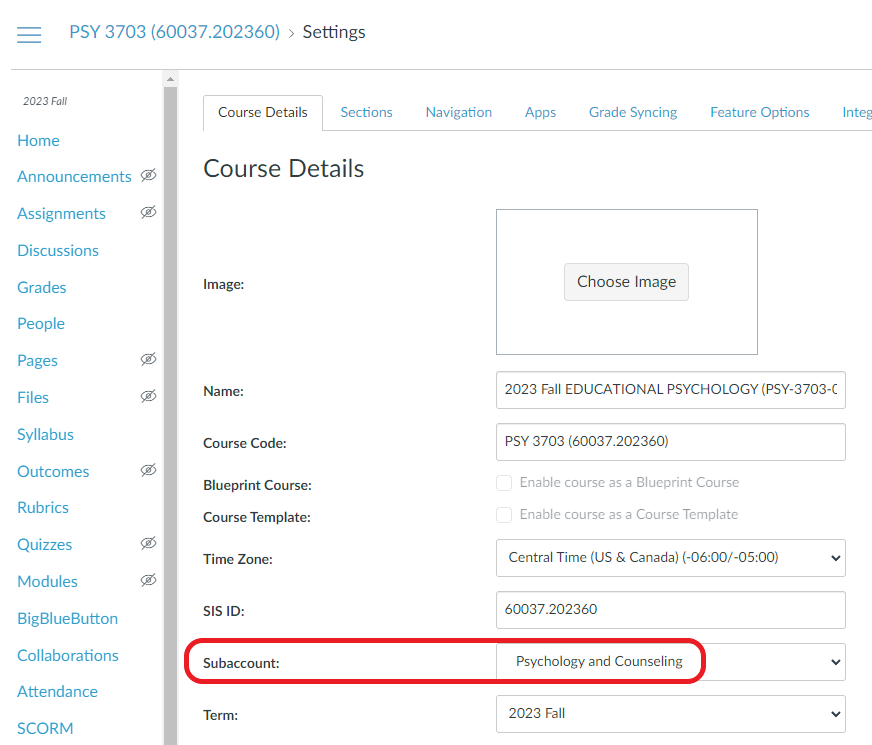
    Location of the subaccount field on the Course Details page in the Settings for a course


  • How do I change a course name?

    Your Course name and code are generated from the information in Banner.  

    To change the displayed name of your course, click the Settings link in the Course Navigation menu.

    You will then be on the Course Details tab. 

    You can then use the Name field to change the name displayed on the Course Card and on the Couse Home Page.

    The course code is a short name for the course and is displayed at the top of the Course Navigation menu and in course cards in the dashboard. The Course Code field is used by Watermark CES (formerly EvaluationKIT), so it should not be changed. 

    To finalize your changes, Click the Update Course Details button found at the bottom of the Course Details page.

  • Publishing Courses

    Courses are not made available by default so that you may choose when or if you want students to have access to them. When you are added to courses you will see them in the Unpublished Courses list on your Dashboard and in the Courses list. 

    Publish in Dashboard

    For instructions on how to make courses available to students see the Canvas Instructor Guide: How do I publish a course?

    Reminder

    Please remember that you will also need to publish all the content in your course that you want to be available to students when the course is published. Guides for publishing different types of content are listed below.

  • Course Access and Dates

    When courses are created, they will have their participation set to Term. This will have the published courses set to be available from the Start to the End dates that IT sets for the Term. For more information about Course and Term Dates, see How do term dates, course dates, and section dates work in Canvas? in the Canvas Basics Guide.

    View Course Dates

    If you would like to set a course to automatically open at the Start Date, you can use the option to Restrict students from viewing course before course start date before you publish the course.

    After the End date courses are placed in a read-only (archived) state. Read-only means that a course is still viewable by the students, but they are not available for submitting assignments, posting discussions, uploading files, grading, or any other action-based task within a course. To prevent students from viewing a course after the End date, you can use the option to Restrict students from viewing course after course end date.

    If you know that a course will need an extension past the end date, so a student can continue to submit materials or for you to grade submitted work, you will want to change the participation from Term to Course. This will allow you to set your own End dates for the course. 

    IMPORTANT - This should be done before the End date, as the course will then be set to the read-only state and you are no longer able to change this setting. If you need to change this after the End date you will need to contact your support office to have this option changed.

    For instructions on how to change course participation dates, see How do I change the start and end dates for a course? in the Canvas Instructor Guide.

  • Adding a Course Banner/Image

    You can upload an image to display behind the course card in the Canvas Dashboard. Accepted images include JPG, JPEG, GIF, and PNG files.

    To assist with creating Banners for your courses, you can reference the Create Canvas cards with PowerPoint article on the How To Canvas site. Or, if you already have an image you would like to use and just need to make some adjustments to be sure that it appears as intended, you can use online resources like Adobe Creative Cloud Express to change an existing image to fit the requirements for a Course Image. This uses a simplified web version of Photoshop that is included with our Campus license for Adobe Creative Cloud.

    For instructions see the Canvas Instructor Guide: How do I add an image to a course card in the Dashboard?

    When added to a course, images display behind a color overlay in the course card. The overlay color is a user setting defined individually by each user in the Dashboard. Although the color overlay can be completely removed by a user, best practice is to use an image that can display well behind a variety of colors.

    Note: Course card images are categorized as decorative images for screen readers.


  • Frequently Asked Questions

    These guides should walk you through several common tasks that faculty need to complete when managing a Canvas shell.


  • How do I "Merge" (Crosslist) Courses

    If you have multiple sections of a course that meets at the same time, you can choose to merge those shells into one. This will take the enrollments from one course and move them to the other course. 

    For instructions on Cross-Listing courses see the Canvas Instructor Guide: How do I cross-list a section in a course as an instructor?

    Cross-listing should be done while courses are unpublished. Coursework is retained with the course, not with the section enrollments, so if a published course is cross-listed, all cross-listed enrollments will lose any associated assignment submissions and grades.

    To cross-list a course, you must know the name of the course or the course ID into which you are cross-listing. However, using a course ID is a better way to confirm you are cross-listing a section into the correct course. See the section on Identifying Courses above for details on finding the Course Code or Course ID to use when cross-listing courses.

    Sections can only be in one course at a time. So if you accidently cross-list a section into the wrong course, you can re-cross-list the section into the correct course if needed.

    If you cross-listed the courses in the wrong order and lost access to the course that had your content, we can de-cross-list the courses for you. Please send us an email with the information in the section on Identifying Courses so we can find your incorrectly cross-listed course.

    Recorded Walkthrough

    The video below will begin 7 min into the video where the discussion on Crosslisting begins. 

  • Add an Instructor or Teaching Assistant

    All enrollments for "Live" courses, those created by Banner, have to go through Banner. To have someone added to your class, you will need to work with your department administrator and the Registrar to have the user added as an Instructor in Banner. Once the Registrar has verified that the user has completed FERPA training, they can be added to the course in Banner. They will then be added to your class at the next odd hour when enrollments are transferred from our Student Information System (Banner) to our Learning Management System (Canvas).

    If you are instead wanting to have someone added to a development course or organization, please contact us. 

  • How do I reuse materials from a past Canvas class?

    You can copy course content such as assignments, modules, pages, and discussions from previous Canvas courses into existing courses. You only have access to copy content from courses in which you are enrolled as a user with instructor permissions.

    For instructions on copying a course see the Canvas Instructor Guide: How do I copy content from another Canvas course using the Course Import tool?

    Notes:

    • Course imports may not include all content. For more details, please see the import content section in the Canvas Basics Guide.
    • Importing a course more than once may have unintended consequences. If you import content into a new course, edit the content in the new course, and later import the previous content again, the imported content will override the existing content.
    • If you copy all content or include course settings in selected content, the grade posting policy from the original course will override the grade posting policy in the new course. The participation dates from the original course will override the participation dates in the new course. Additionally, imported assignments will retain their assignment posting policy and participation dates from the original course.
  • How do I retrieve an Archived Blackboard Course

    You can retrieve Archived content from Spring 2019 and earlier from our Blackboard Utility Package. Blackboard Classes from Summer 2019 to Summer 2023 are instead located in the K16 Archive Platform (Blackboard). Instructions for using the Blackboard Utility Package are located below, but please contact our office for assistance with the K16 Archive Platform or if you have any trouble locating a past course.

    Blackboard Utility Package

    ArchivedCourses.PNG

    When you select Archived Courses in the right menu you should see a list of past courses. By clicking the listed Course ID, you can download a package file that contains all the content from the old course.

    DownloadArchives.PNG

    That downloaded zip file can then be imported into a Canvas course via the Canvas Course Import Tool. The Course Import tool makes extracting course content, assignments, and quizzes from previous terms and importing them into existing courses both quick and easy. To import the zip file downloaded from the Blackboard Utility Package, select Blackboard 6/7/8/9 export .zip file from the Content Type dropdown menu and then browse to locate the file saved on your computer. To learn more about importing these packages, see the Canvas help site


    Classes restored through this import process will only contain the materials used to teach the class. They do not contain student work or grades from the past class. If you need grades and student work from one of these Archived classes, you will need to open a ticket with the ITS HelpDesk

  • How do I accommodate different availability settings?

    I Need Different Availability Dates

    If you want to give them different start, stop, and due dates, you can use the Add button under the Assign To box. That will change the first box to be the dates assigned to everyone else and give you a second box to select individual students or groups. This new Assign To box will then let you give the selected students different availability dates from the rest of the class. 

    https://community.canvaslms.com/t5/Instructor-Guide/How-do-I-assign-a-quiz-to-an-individual-student/ta-p/714

    Do Not change the single Assign To box to just have either a group or single student selected, as that will unassign it from the rest of the class. This will cause those submitted assignments to disappear from anyone who was removed from the Assign To Box. To restore their missing assignments, you just need to add back an Assign To box for Everyone Else, in addition to the other box for the students with an exception to their availability dates. 

    I Need a Different Timer or Extra Attempts

    If you instead need to give one student a longer timer on the exam or extra attempts, you can use the Moderate option. The way you access the Moderate option is slightly different depending on whether you are using the Classic or New Quiz system. See the links to the Canvas Instructor Guide below for the instructions for the quiz type you are using.

  • How do I share Course Materials?

    To use the course copy options, you must be listed as an instructor in both courses, but there are three other methods you can use to share content with other instructors.

    The first would be to use the Send To option in a Module to send all the module content to another instructor, the second would be exporting the whole course as a zip file, and finally, you can upload either specific items or the entire course to the Canvas Commons. Using the Canvas Commons will create an eternal copy that can be used by any faculty member who needs a good starting point for their course builds. You can even restrict the Commons course to only A-State users if necessary. Instructions on how to send content through those three methods are linked below.

    Depending on which option was used, the other instructor can follow the instructions in the corresponding link below to import that content into their courses.

  • What does "file storage quota exceeded" mean?

    ITS has set a course size limit of 2 GB. This limit was set to keep us within the storage space we are allotted. If you try to add content to a course that would exceed this limit, you will receive a "file storage quota exceeded" error message. 

    Canvas Procedures

    To fix this issue in Canvas, first check the Files area of your course. 

    You can then view your user quota and what percentage of that quota has been used [2]. To learn how to manage course files, see the Canvas Instructor Guide: How do I use Files as an instructor?.

    If you want to see the files for all your courses, click the All My Files link [3].

    Blackboard Procedures

    If your export file would put your course over the 2 GB limit you receive errors like the one below when trying to import it into Canvas. 

    Action not complete: Adding the selected content to the specified folder causes the folder to exceed its quota.

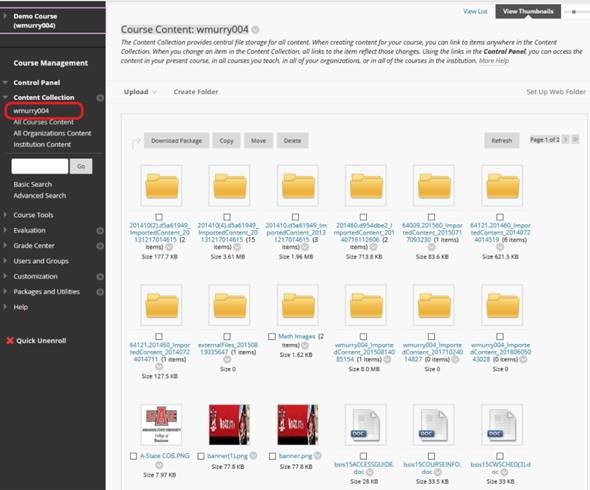
    Before you can import the course you will need to check the Course Content collection of the Blackboard class. If you select the Course ID from the Content Collection menu in the Control Panel you will see all the files in the class. You will need to go through these files to remove any duplicated material or resources that you no longer need in the class. Any videos that are stored here should be moved to Kaltura, as that is our video management service. Videos stored in Kaltura can be linked to your class without using any of your allotted space. Once you have freed up enough space here you should be able to create a new export that is under the 2 GB limit.

    Course Files

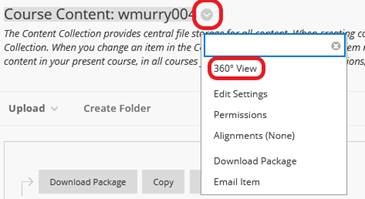
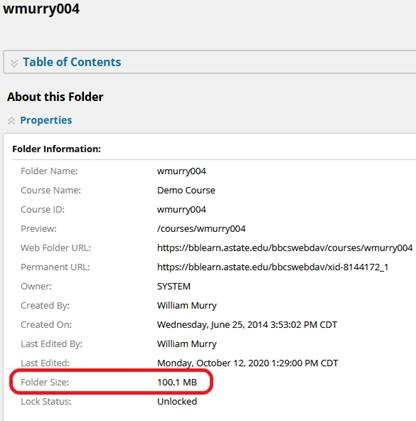
    You can check the true size of the class from the content collection as well. If you click the options chevron next to the Course ID you should have an option for 360 view. 

    360View

    That page will list the Folder Size for this course.

    CourseSize


  • Support

    If you are having other issues that aren't mentioned above, these resources should help.


  • Clear Cache - Fixes Most Issues

    Browsers download many files from websites to speed up your experience and prevent wasting your bandwidth redownloading files you've accessed in the past. Occasionally these files will get corrupted, which causes the website to no longer function as expected. You can resolve these issues by clearing the browser cache and forcing it to redownload those files. Instructions for clearing browser cache can be found on the ITS support page on Cache

  • OnDemand Training Resources

    Self Paced Training

    A-State Resources

    Recordings of the in-person sessions that we have done are available through our Kaltura Canvas Training Resources for asynchronous viewing.

    Search the list of Self-Paced Professional Development Courses developed for our Campus and available through our Canvas instance.

    Canvas Resources

    Canvas has several resources available for faculty to review. These items are also all in the Help link found in everyone's Global Navigation Menu.

    The Help link also includes a phone number and a link to a live chat for 24-7 support. 

    In Person Trainings

    Check our Calendar often to enroll or look for various class offerings. Review the Daily Digest for new and upcoming sessions.

  • Support Contacts

    Information & Technology Services provides support for technical issues. This would include issues with your username and password or DUO.

    The Center for Excellence in Teaching and Learning staff provides faculty support and training for using Canvas, including assistance with digitizing, updating or creating course content in formats suitable for use in your courses.  

    The A-State Online Faculty Support provides faculty support and training for the A-State Online Services programs.

  • LTI/Third-Party Integrations

    Integrations are extension tools from third-party partners (vendors) which allow faculty to enhance their Canvas course and the student experience.

    For integrations, you can easily submit this form-(Canvas Help service form) under the type of Canvas request – choose Canvas Design for review. ITS requires the IT Security Questionnaire/Vendor HECVAT to be sent and approved by Security@astate.edu  in order to proceed with setup. This will only be set up specific times of the year to avoid issues. Please have all your information submitted so we can begin the process- June 1st- August 1st would be the timeframe however depending on the course, concessions will be made.

    Feel free to share this link to the Canvas help form with anyone including students as there is a support option as well. Support for third-party partner tools is provided by the partner company. Support contacts and information for commonly used tools are listed in the sections below.